在人工智能进展的如火如荼的今天,我们如果不尝试去接触新鲜事物,马上就要被世界淘汰啦~
本文拟使用Python开发语言实现类似于WIndows平台的“小娜”,或者是IOS下的“Siri”。最终达到人机对话的效果。
【实现功能】
这篇文章将要介绍的主要内容如下:
1、搭建人工智能--人机对话服务端平台 2、实现调用服务端平台进行人机对话交互
【实现思路】
AIML
AIML由Richard Wallace发明。他设计了一个名为 A.L.I.C.E. (Artificial Linguistics Internet Computer Entity 人工语言网计算机实体) 的机器人,并获得了多项人工智能大奖。有趣的是,图灵测试的其中一项就在寻找这样的人工智能:人与机器人通过文本界面展开数分钟的交流,以此查看机器人是否会被当作人类。
本文就使用了Python语言调用AIML库进行智能机器人的开发。
本系统的运作方式是使用Python搭建服务端后台接口,供各平台可以直接调用。然后客户端进行对智能对话api接口的调用,服务端分析参数数据,进行语句的分析,最终返回应答结果。
当前系统前端使用HTML进行简单地聊天室的设计与编写,使用异步请求的方式渲染数据。
【开发及部署环境】
开发环境:Windows 7 ×64 英文版
JetBrains PyCharm 2017.1.3 x64
测试环境:Windows 7 ×64 英文版
【所需技术】
1、Python语言的熟练掌握,Python版本2.7 2、Python服务端开发框架tornado的使用 3、aiml库接口的简单使用 4、HTML+CSS+Javascript(jquery)的熟练使用 5、Ajax技术的掌握
【实现过程】
1、安装Python aiml库
pip install aiml2、获取alice资源
Python aiml安装完成后在Python安装目录下的 Lib/site-packages/aiml下会有alice子目录,将此目录复制到工作区。 或者在Google code上下载alice brain: aiml-en-us-foundation-alice.v1-9.zip
3、Python下加载alice
取得alice资源之后就可以直接利用Python aiml库加载alice brain了:
import aiml
os.chdir('./src/alice') # 将工作区目录切换到刚才复制的alice文件夹
alice = aiml.Kernel()
alice.learn("startup.xml")
alice.respond('LOAD ALICE')
注意加载时需要切换工作目录到alice(刚才复制的文件夹)下。
4、 与alice聊天
加载之后就可以与alice聊天了,每次只需要调用respond接口:
alice.respond('hello') #这里的hello即为发给机器人的信息 5. 用Tornado搭建聊天机器人网站
Tornado可以很方便地搭建一个web网站的服务端,并且接口风格是Rest风格,可以很方便搭建一个通用的服务端接口。
这里写两个方法:
get:渲染界面
post:获取请求参数,并分析,返回聊天结果
Class类的代码如下:
class ChatHandler(tornado.web.RequestHandler):
 def get(self):
 self.render('chat.html')

 def post(self):
 try:
 message = self.get_argument('msg', None)

 print(str(message))

 result = {
 'is_success': True,
 'message': str(alice.respond(message))
 }

 print(str(result))

 respon_json = tornado.escape.json_encode(result)

 self.write(respon_json)

 except Exception, ex:
 repr(ex)
 print(str(ex))

 result = {
 'is_success': False,
 'message': ''
 }

 self.write(str(result))
6. 简单搭建一个聊天界面
该界面是基于BootStrap的,我们简单搭建这么一个聊天的界面用于展示我们的接口结果。同时进行简单的聊天。
7. 接口调用
我们异步请求服务端接口,并将结果渲染到界面
 $.ajax({
 type: 'post',
 url: AppDomain+'chat',
 async: true,//异步
 dataType: 'json',
 data: (
 {
 "msg":request_txt
 }),
 success: function (data)
 {
 console.log(JSON.stringify(data));
 if (data.is_success == true) {
 setView(resUser,data.message);
 }
 },
 error: function (data)
 {
 console.log(JSON.stringify(data));
 }
 });//end Ajax
这里我附上系统的完整目录结构以及完整代码->
8、目录结构

9、Python服务端代码
#!/usr/bin/env python

# -*- coding: utf-8 -*-

import os.path
import tornado.auth
import tornado.escape
import tornado.httpserver
import tornado.ioloop
import tornado.options
import tornado.web
from tornado.options import define, options

import os
import aiml

os.chdir('./src/alice')
alice = aiml.Kernel()
alice.learn("startup.xml")
alice.respond('LOAD ALICE')


define('port', default=3999, help='run on the given port', type=int)


class Application(tornado.web.Application):
 def __init__(self):
 handlers = [
 (r'/', MainHandler),
 (r'/chat', ChatHandler),
 ]

 settings = dict(
 template_path=os.path.join(os.path.dirname(__file__), 'templates'),
 static_path=os.path.join(os.path.dirname(__file__), 'static'),
 debug=True,
 )

 # conn = pymongo.Connection('localhost', 12345)
 # self.db = conn['demo']
 tornado.web.Application.__init__(self, handlers, **settings)


class MainHandler(tornado.web.RequestHandler):
 def get(self):
 self.render('index.html')

 def post(self):

 result = {
 'is_success': True,
 'message': '123'
 }

 respon_json = tornado.escape.json_encode(result)
 self.write(str(respon_json))

 def put(self):
 respon_json = tornado.escape.json_encode("{'name':'qixiao','age':123}")
 self.write(respon_json)


class ChatHandler(tornado.web.RequestHandler):
 def get(self):
 self.render('chat.html')

 def post(self):
 try:
 message = self.get_argument('msg', None)

 print(str(message))

 result = {
 'is_success': True,
 'message': str(alice.respond(message))
 }

 print(str(result))

 respon_json = tornado.escape.json_encode(result)

 self.write(respon_json)

 except Exception, ex:
 repr(ex)
 print(str(ex))

 result = {
 'is_success': False,
 'message': ''
 }

 self.write(str(result))


def main():
 tornado.options.parse_command_line()
 http_server = tornado.httpserver.HTTPServer(Application())
 http_server.listen(options.port)
 tornado.ioloop.IOLoop.instance().start()


if __name__ == '__main__':
 print('HTTP server starting ...')
 main()
9、Html前端代码
 <!DOCTYPE html>
<html>
<head>
 <link rel="icon" href="qixiao.ico" type="image/x-icon"/>
 <title>qixiao tools</title>
 <link rel="stylesheet" type="text/css" href="../static/css/bootstrap.min.css">

 <script type="text/javascript" src="../static/js/jquery-3.2.0.min.js"></script>
 <script type="text/javascript" src="../static/js/bootstrap.min.js"></script>

 <style type="text/css">
 .top-margin-20{
 margin-top: 20px;
 }
 #result_table,#result_table thead th{
 text-align: center;
 }
 #result_table .td-width-40{
 width: 40%;
 }
 </style>

 <script type="text/javascript">


 </script>
 <script type="text/javascript">
 var AppDomain = 'http://localhost:3999/'
 $(document).ready(function(){
 $("#btn_sub").click(function(){
 var user = 'qixiao(10011)';
 var resUser = 'alice (3333)';

 var request_txt = $("#txt_sub").val();

 setView(user,request_txt);

 $.ajax({
 type: 'post',
 url: AppDomain+'chat',
 async: true,//异步
 dataType: 'json',
 data: (
 {
 "msg":request_txt
 }),
 success: function (data)
 {
 console.log(JSON.stringify(data));
 if (data.is_success == true) {
 setView(resUser,data.message);
 }
 },
 error: function (data)
 {
 console.log(JSON.stringify(data));
 }
 });//end Ajax


 });

 });
 function setView(user,text)
 {
 var subTxt = user + " "+new Date().toLocaleTimeString() +'\n·'+ text;
 $("#txt_view").val($("#txt_view").val()+'\n\n'+subTxt);

 var scrollTop = $("#txt_view")[0].scrollHeight;
 $("#txt_view").scrollTop(scrollTop);
 }
 </script>
</head>
<body class="container">
 <header class="row">
 <header class="row">
 <a href="/" class="col-md-2" style="font-family: SimHei;font-size: 20px;text-align:center;margin-top: 30px;">
 <span class="glyphicon glyphicon-home"></span>Home
 </a>
 <font class="col-md-4 col-md-offset-2" style="font-family: SimHei;font-size: 30px;text-align:center;margin-top: 30px;">
 <a href="/tools" style="cursor: pointer;">QiXiao - Chat</a>
 </font>
 </header>
 <hr>

 <article class="row">

 <section class="col-md-10 col-md-offset-1" style="border:border:solid #4B5288 1px;padding:0">Admin : QiXiao </section>
 <section class="col-md-10 col-md-offset-1 row" style="border:solid #4B5288 1px;padding:0">
 <section class="col-md-9" style="height: 400px;">
 <section class="row" style="height: 270px;">
 <textarea class="form-control" style="width:100%;height: 100%;resize: none;overflow-x: none;overflow-y: scroll;" readonly="true" id="txt_view"></textarea>
 </section>
 <section class="row" style="height: 130px;border-top:solid #4B5288 1px; ">
 <textarea class="form-control" style="overflow-y: scroll;overflow-x: none;resize: none;width: 100%;height:70%;border: #fff" id="txt_sub"></textarea>
 <button class="btn btn-primary" style="float: right;margin: 0 5px 0 0" id="btn_sub">Submit</button>
 </section>
 </section>
 <section class="col-md-3" style="height: 400px;border-left: solid #4B5288 1px;"></section>
 </section>
 </article>
 </body>
 </html>
【系统测试】
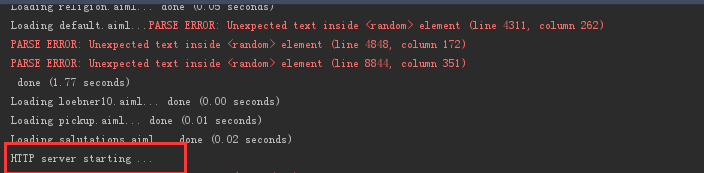
1、首先我们将我们的服务运行起来
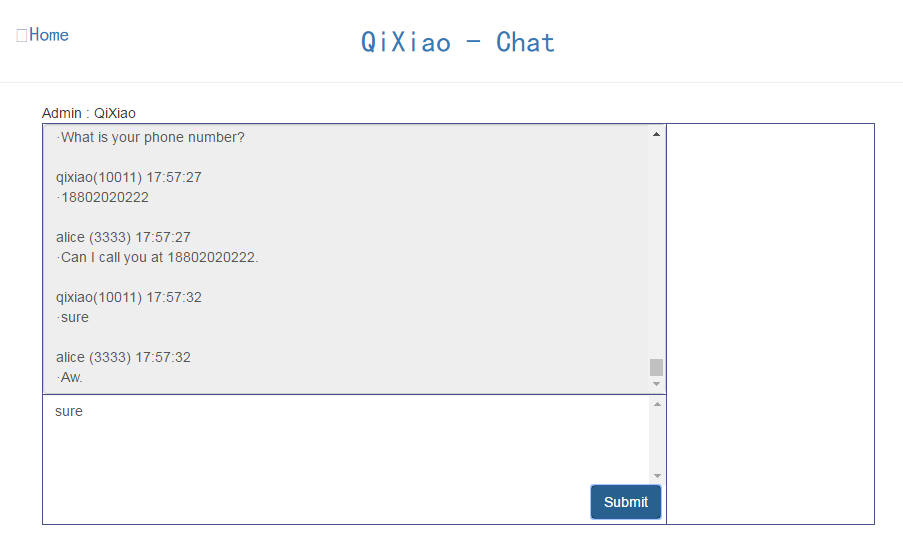
2、调用测试
然后我们进行前台界面的调用
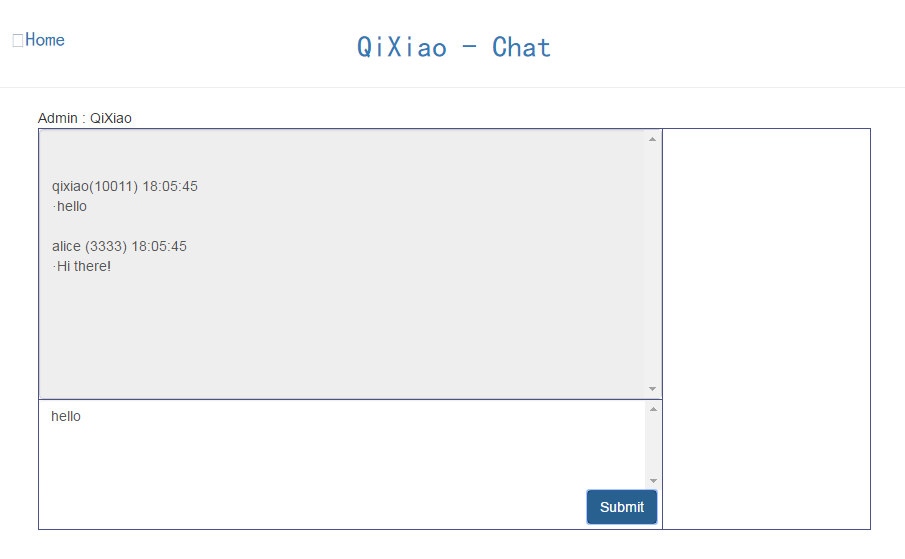
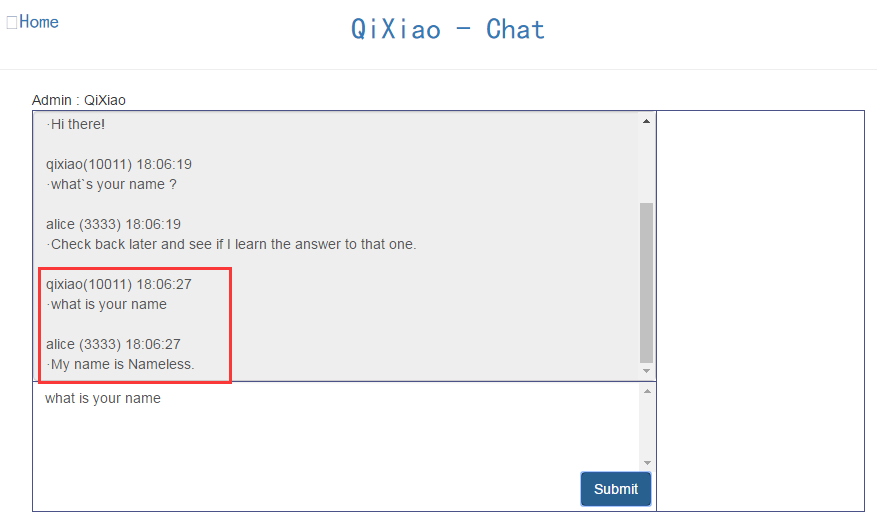
这里我们可以看到,我们的项目完美运行,并且达到预期效果。
【可能遇到问题】
中文乱码
【系统展望】
经过测试,中文目前不能进行对话,只能使用英文进行对话操作,有待改善。
以上就是本文的全部内容,希望对大家的学习有所帮助,也希望大家多多支持脚本之家。